代码随想录_链表
1.链表:移除链表元素
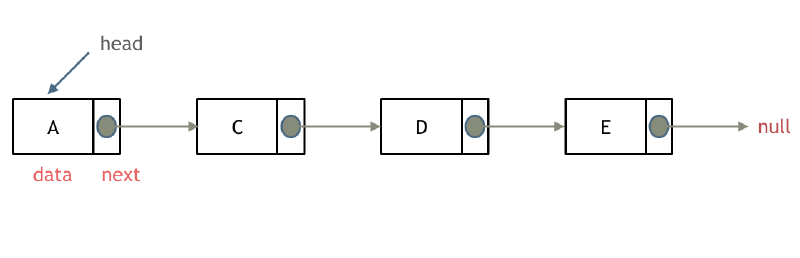
这种情况下的移除操作,就是让节点next指针直接指向下下一个节点就可以了。
因为单链表的特殊性,只能指向下一个节点,刚刚删除的是链表的中第二个,和第四个节点,那么如果删除的是头结点又该怎么办呢?
链表操作的两种方式:
- 直接使用原来的链表来进行删除操作。
- 设置一个虚拟头结点在进行删除操作。
直接使用原来的链表来进行移除节点操作:
 1
 2
 3
 4
 5
 6
 7
 8
 9
10
11
12
13
14
15
16
17
18
19
20
21
22
23
24
25
| class Solution {
public:
ListNode* removeElements(ListNode* head, int val) {
// 删除头结点
while (head != NULL && head->val == val) { // 注意这里不是if,可能头部有多个target节点
ListNode* tmp = head;
head = head->next;
delete tmp;//注意删除
}
// 删除非头结点
//主要判断的是cur->next这个节点,但是需要前一个节点,所以这样进行遍历
ListNode* cur = head;
while (cur != NULL && cur->next!= NULL) {//需要判断操作head之后是否还需要操作
if (cur->next->val == val) {
ListNode* tmp = cur->next;
cur->next = cur->next->next;
delete tmp;
} else {
cur = cur->next;//如果不是,直接移动到下一个节点
}
}
return head;
}
};
|
设置一个虚拟头结点在进行移除节点操作:
 1
 2
 3
 4
 5
 6
 7
 8
 9
10
11
12
13
14
15
16
17
18
19
20
| class Solution {
public:
ListNode* removeElements(ListNode* head, int val) {
ListNode* dummyHead = new ListNode(0); // 设置一个虚拟头结点
dummyHead->next = head; // 将虚拟头结点指向head,这样方便后面做删除操作
ListNode* cur = dummyHead;
while (cur->next != NULL) {
if(cur->next->val == val) {
ListNode* tmp = cur->next;
cur->next = cur->next->next;
delete tmp;
} else {
cur = cur->next;
}
}
head = dummyHead->next;
delete dummyHead;
return head;
}
};
|
2.链表:设计链表
 1
 2
 3
 4
 5
 6
 7
 8
 9
10
11
12
13
14
15
16
17
18
19
20
21
22
23
24
25
26
27
28
29
30
31
32
33
34
35
36
37
38
39
40
41
42
43
44
45
46
47
48
49
50
51
52
53
54
55
56
57
58
59
60
61
62
63
64
65
66
| class MyLinkedList {
public:
struct ListNode{
int val;
ListNode* next;
ListNode(int val):val(val),next(nullptr){}
};
MyLinkedList() {
_dummyhead= new ListNode(0);
_size = 0;
}
int get(int index){
if(index<0||index>(_size-1))return -1;
ListNode* cur= _dummyhead->next;
while(index--){
cur=cur->next;
}
return cur->val;
}
void addAtHead(int val) {
ListNode* newhead = new ListNode(val);
newhead->next=_dummyhead->next;
_dummyhead->next=newhead;
_size++;
}
void addAtTail(int val) {
ListNode* cur=_dummyhead;
while(cur->next!=nullptr)cur=cur->next;
ListNode* newnode = new ListNode(val);
cur->next = newnode;
_size++;
}
void addAtIndex(int index, int val) {
if(index>_size||index<0)return ;/当index==_size,插入到最后
ListNode* newnode=new ListNode(val);
ListNode* cur=_dummyhead;
while(index--){
cur=cur->next;
}
newnode->next = cur->next;
cur->next = newnode;
_size++;
}
void deleteAtIndex(int index) {
if(index>=_size||index<0)return ;
ListNode* cur=_dummyhead;
while(index--){
cur=cur->next;
}
ListNode* tmp=cur->next;
cur->next=cur->next->next;
delete tmp;
tmp=nullptr;
_size--;
}
private:
int _size;
ListNode* _dummyhead;
};
|
2.链表:翻转链表
首先定义一个cur指针,指向头结点,再定义一个pre指针,初始化为null。
然后就要开始反转了,首先要把 cur->next 节点用tmp指针保存一下,也就是保存一下这个节点。
为什么要保存一下这个节点呢,因为接下来要改变 cur->next 的指向了,将cur->next 指向pre ,此时已经反转了第一个节点了。
接下来,就是循环走如下代码逻辑了,继续移动pre和cur指针。
最后,cur 指针已经指向了null,循环结束,链表也反转完毕了。 此时我们return pre指针就可以了,pre指针就指向了新的头结点。
 1
 2
 3
 4
 5
 6
 7
 8
 9
10
11
12
13
14
15
16
| class Solution {
public:
ListNode* reverseList(ListNode* head) {
ListNode* temp; // 保存cur的下一个节点
ListNode* cur = head;
ListNode* pre = NULL;
while(cur) {
temp = cur->next; // 保存一下 cur的下一个节点,因为接下来要改变cur->next
cur->next = pre; // 翻转操作
// 更新pre 和 cur指针
pre = cur;
cur = temp;
}
return pre;
}
};
|
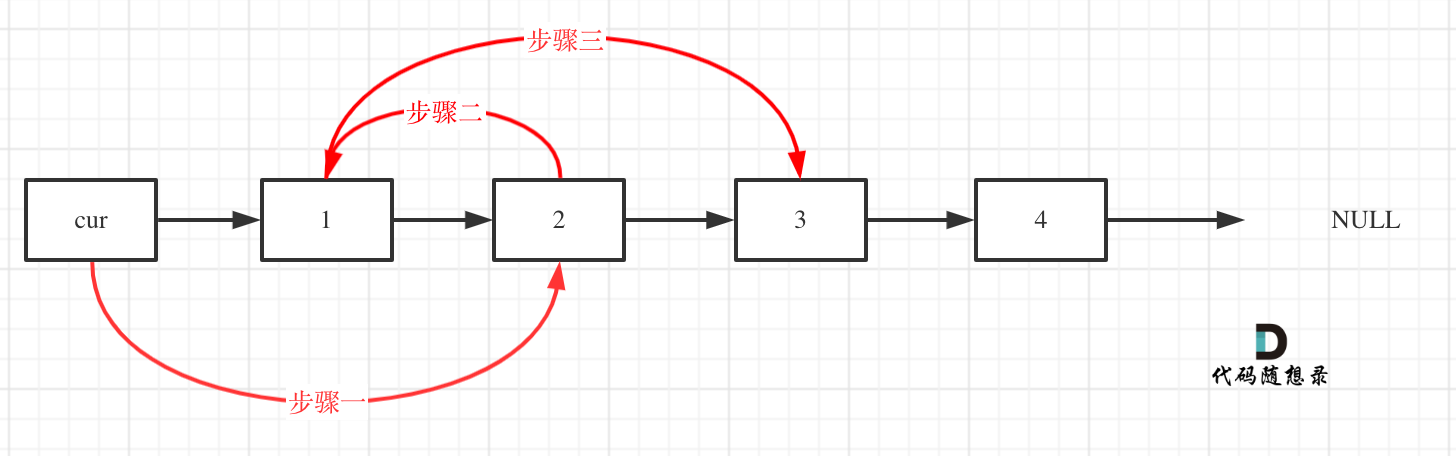
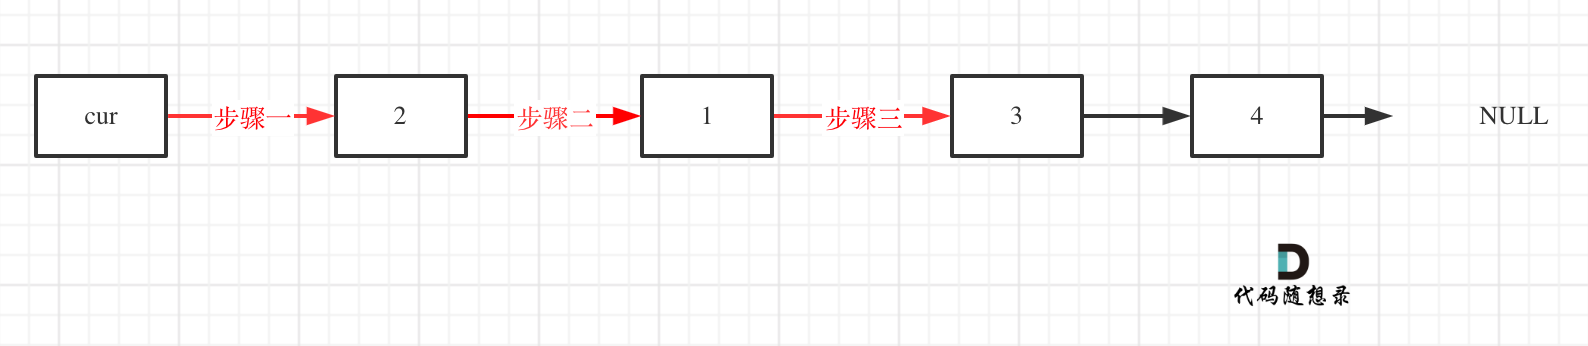
3.链表:两两交换链表中的节点
使用虚拟头结点,接下来就是交换相邻两个元素了,此时一定要画图,不画图,操作多个指针很容易乱,而且要操作的先后顺序

 1
 2
 3
 4
 5
 6
 7
 8
 9
10
11
12
13
14
15
16
17
18
19
20
21
| shaclass Solution {
public:
ListNode* swapPairs(ListNode* head) {
ListNode* dummyHead = new ListNode(0); // 设置一个虚拟头结点
dummyHead->next = head; // 将虚拟头结点指向head,这样方便后面做删除操作
ListNode* cur = dummyHead;
while(cur->next != nullptr && cur->next->next != nullptr) {
ListNode* tmp = cur->next; // 记录临时节点
ListNode* tmp1 = cur->next->next->next; // 记录临时节点
cur->next = cur->next->next; // 步骤一
cur->next->next = tmp; // 步骤二
cur->next->next->next = tmp1; // 步骤三
cur = cur->next->next; // cur移动两位,准备下一轮交换
}
ListNode* result = dummyHead->next;
delete dummyHead;
return result;
}
};
|
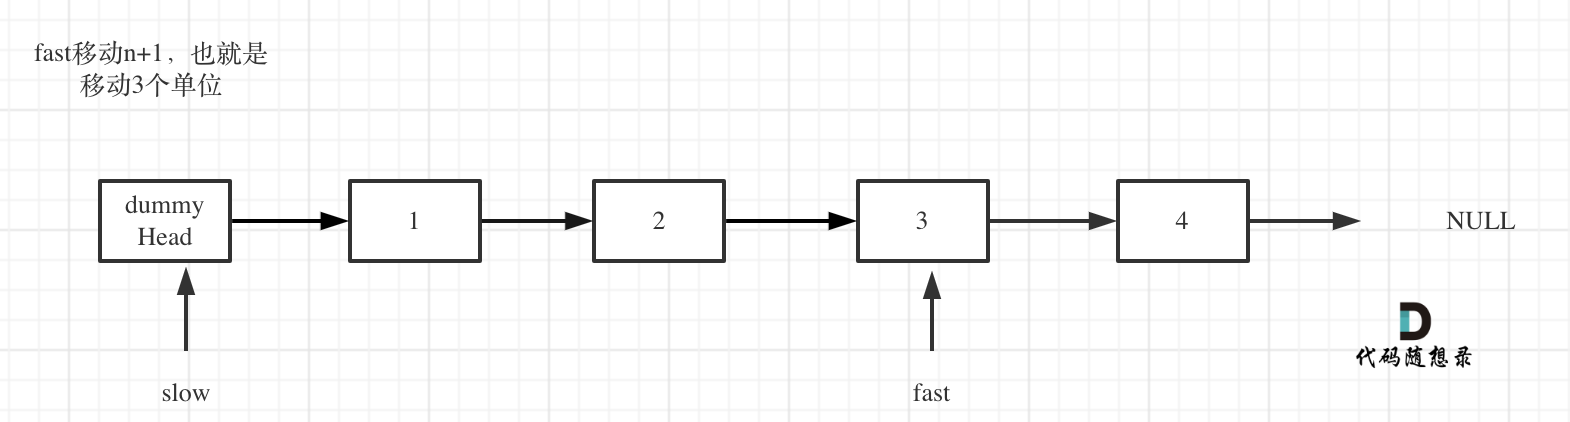
4.链表:删除链表的倒数第N个节点
fast首先走n + 1步 ,为什么是n+1呢,因为只有这样同时移动的时候slow才能指向删除节点的上一个节点(方便做删除操作),如图:
 1
 2
 3
 4
 5
 6
 7
 8
 9
10
11
12
13
14
15
16
17
18
19
20
21
22
23
24
| class Solution {
public:
ListNode* removeNthFromEnd(ListNode* head, int n) {
ListNode* dummyHead = new ListNode(0);
dummyHead->next = head;
ListNode* slow = dummyHead;
ListNode* fast = dummyHead;
while(n-- && fast != NULL) {
fast = fast->next;
}
fast = fast->next; // fast再提前走一步,因为需要让slow指向删除节点的上一个节点
while (fast != NULL) {
fast = fast->next;
slow = slow->next;
}
slow->next = slow->next->next;
// ListNode *tmp = slow->next; C++释放内存的逻辑
// slow->next = tmp->next;
// delete tmp;
return dummyHead->next;
}
};
|
5.链表:链表相交
对于这道题目,重点是判断两个链表是否是交点可以判断两个指针是否相同
 1
 2
 3
 4
 5
 6
 7
 8
 9
10
11
12
13
14
15
16
17
18
19
20
21
22
23
24
25
26
27
28
29
30
31
32
33
34
35
36
37
38
39
40
| /**
* Definition for singly-linked list.
* struct ListNode {
* int val;
* ListNode *next;
* ListNode(int x) : val(x), next(NULL) {}
* };
*/
class Solution {
public:
ListNode *getIntersectionNode(ListNode *headA, ListNode *headB) {
ListNode* t1=headA;
ListNode* t2=headB;
int l1=0,l2=0;
while(t1!=NULL){
l1++;
t1=t1->next;
}
while(t2!=NULL){
l2++;
t2=t2->next;
}
t1=headA;
t2=headB;
if(l1<l2){
swap(l1,l2);
swap(t1,t2);
}
int len=l1-l2;
while(len--){
t1=t1->next;
}
while(t1!=NULL&&t2!=NULL){
if(t1==t2)return t1;
t1=t1->next;
t2=t2->next;
}
return NULL;
}
};
|
6.链表:环形链表
这道题很经典,使用快慢指针是很好的方法,同时需要查找交点,需要考虑一些数学性质。
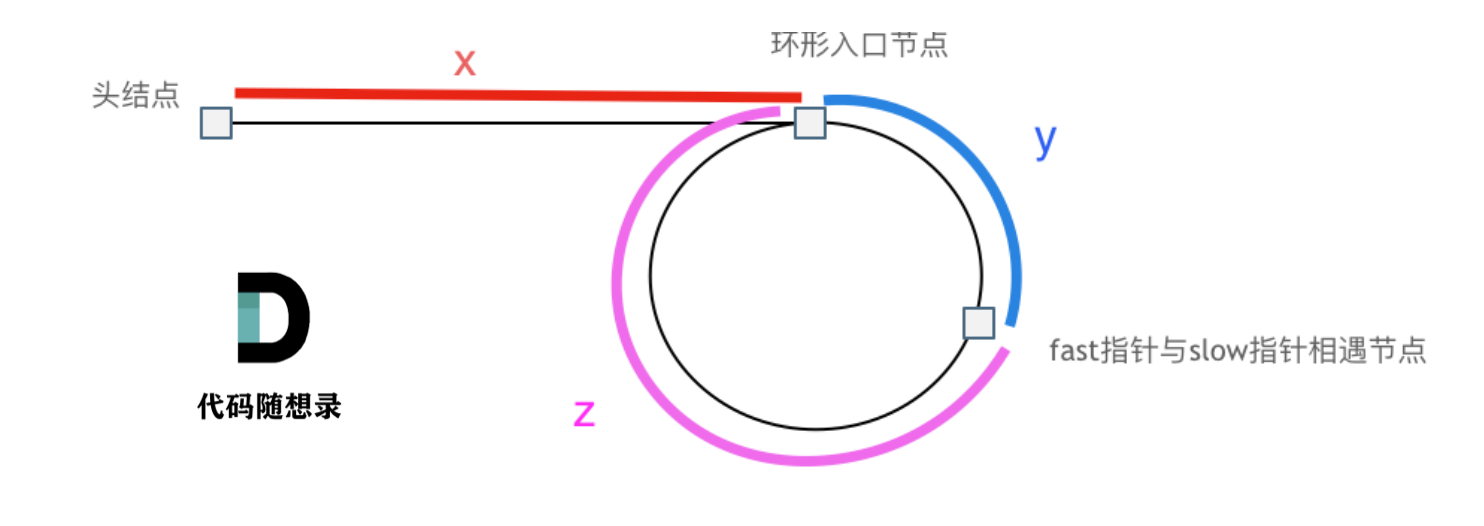
关键就是找到x的对应位置,由快慢指针的等式
$$2(x+y)=x+y+n*(y+z),n≥1$$则
$$x=(n-1)*(y+z)+z$$那么只需要在相遇的地方和头节点设立指针进行轮转即可
这种快慢指针思路在很多判断环存在的场景都很有用。可以去leetcode上多了解相关题目
代码随想录